Building a DVD Rental Admin App with Spring Boot + Thymeleaf Based on the PostgreSQL dvdrental Sample DB
When building the DVD rental admin app, the first decision wasn’t the UI — it was “what data to build on.”
Rather than designing tables from scratch this time, I proceeded by using dvdrental, known as a PostgreSQL sample database, as the foundation and building an admin screen on top of it.
In other words, this article summarizes how dvdrental was mapped into an admin screen app using Java / Spring Boot / Thymeleaf / PostgreSQL.
The sample DB used as the basis this time can be found at the following page.
This article summarizes the thinking behind how the DVD rental admin app itself was assembled.
For anyone searching around terms like a Spring Boot admin screen using the PostgreSQL sample database dvdrental, a Thymeleaf admin screen, a DVD rental admin system, or screen design based on the dvdrental ER diagram, this covers the implementation flow and the thinking behind the screen design.
What You’ll Learn from This Article
- Why the PostgreSQL sample DB
dvdrentalwas used as the foundation for a business app - The flow of building an admin app with Spring Boot + Thymeleaf
- How customers, stores, staff, inventory, rentals, and payments were mapped to screens based on the ER diagram
- How JPA and SQL were used differently
- Techniques for making it usable as a business app, such as retaining search conditions and confirmation screens
The main features built this time are as follows.
- Login
- Dashboard
- Customer management
- Store management
- Staff management
- Inventory management
- Payment management
- Rental management
- Sales report
Why the PostgreSQL Sample DB dvdrental Was Used as the Foundation
The very first thing settled for this app was using the PostgreSQL sample DB as the foundation.
dvdrental comes with the tables needed for DVD rental operations — stores, staff, customers, films, inventory, rentals, and payments — already in place from the start.
That turned out to matter quite a bit, because development could start with subject matter like the following already available:
- Search screens like customer lists and staff lists
- Reference screens like customer details and payment details
- Aggregations built around rentals and payments
- CRUD-style screens for stores, inventory, and customers
Rather than designing business tables from scratch, it felt easier to first understand the existing schema and data, then build screens on top of it.
First, Made the Sample DB Usable As-Is
In this repository, docker/postgres/init/01-dvdrental-full.sql is loaded when the local PostgreSQL starts up.
docker/postgres/init/02-convert-currency-to-jpy.sql is also applied on top of that, so screens can be checked with payment amounts converted into yen.
How dvdrental was localized into Japanese, how the work was split between CSV and SQL, and how the yen-converted full dataset was built — that’s covered in this article.
Organized the dvdrental ER Diagram and Key Table Relationships
Before starting to build screens, I first roughly organized the relationships between the tables that would be central to this admin screen.
dvdrental has a lot of tables, but trying to trace all of them in detail from the start tends to scatter your thinking rather than help it. So I first focused on the key tables directly tied to screens: customers, staff, stores, films, inventory, rentals, and payments.
Simplified, the relationships that ended up central to this admin screen look like this.
erDiagram
	STORE ||--o{ STAFF : has
	STORE ||--o{ CUSTOMER : has
	STORE ||--o{ INVENTORY : stocks
	STAFF ||--o{ RENTAL : handles
	STAFF ||--o{ PAYMENT : handles
	CUSTOMER ||--o{ RENTAL : rents
	CUSTOMER ||--o{ PAYMENT : pays
	FILM ||--o{ INVENTORY : stocked_as
	INVENTORY ||--o{ RENTAL : rented_as
	RENTAL ||--o{ PAYMENT : billed_by

	STORE {
		int store_id PK
		int manager_staff_id FK
		int address_id FK
	}

	STAFF {
		int staff_id PK
		int store_id FK
		int address_id FK
		string username
		boolean active
	}

	CUSTOMER {
		int customer_id PK
		int store_id FK
		int address_id FK
		boolean activebool
	}

	FILM {
		int film_id PK
		int language_id FK
		string title
		decimal rental_rate
	}

	INVENTORY {
		int inventory_id PK
		int film_id FK
		int store_id FK
	}

	RENTAL {
		int rental_id PK
		int inventory_id FK
		int customer_id FK
		int staff_id FK
		datetime rental_date
		datetime return_date
	}

	PAYMENT {
		int payment_id PK
		int customer_id FK
		int staff_id FK
		int rental_id FK
		decimal amount
		datetime payment_date
	}
Having this diagram settled beforehand makes it easier to organize the role of each screen too. For example: customer management becomes a screen centered on customer that also looks at store and payment; rental management becomes a screen centered on rental that traces inventory, film, and customer; payment management becomes a screen centered on payment that looks at customer, staff, and rental.
In other words, the ER diagram wasn’t just for confirming the DB design — I used it as the foundation for deciding which screen should pull together which group of tables.
What Kind of Admin App Was Built with Spring Boot + Thymeleaf
The app itself is a server-rendered admin screen using Spring Boot + Thymeleaf.
In other words, it’s built as a setup where you can concretely trace how a business-facing web admin screen using Java and PostgreSQL was assembled with Spring Boot and Thymeleaf.
The main tech stack is as follows.
- Java 25
- Spring Boot 4
- Thymeleaf
- Spring Security
- Spring Data JPA
- NamedParameterJdbcTemplate
- PostgreSQL
- Flyway
- Docker
Rather than leaning toward an SPA, I built it by stacking up search, detail, registration, update, and confirmation in sequence. This is more straightforward to build for a business screen, and state retention is easier to reason about too.
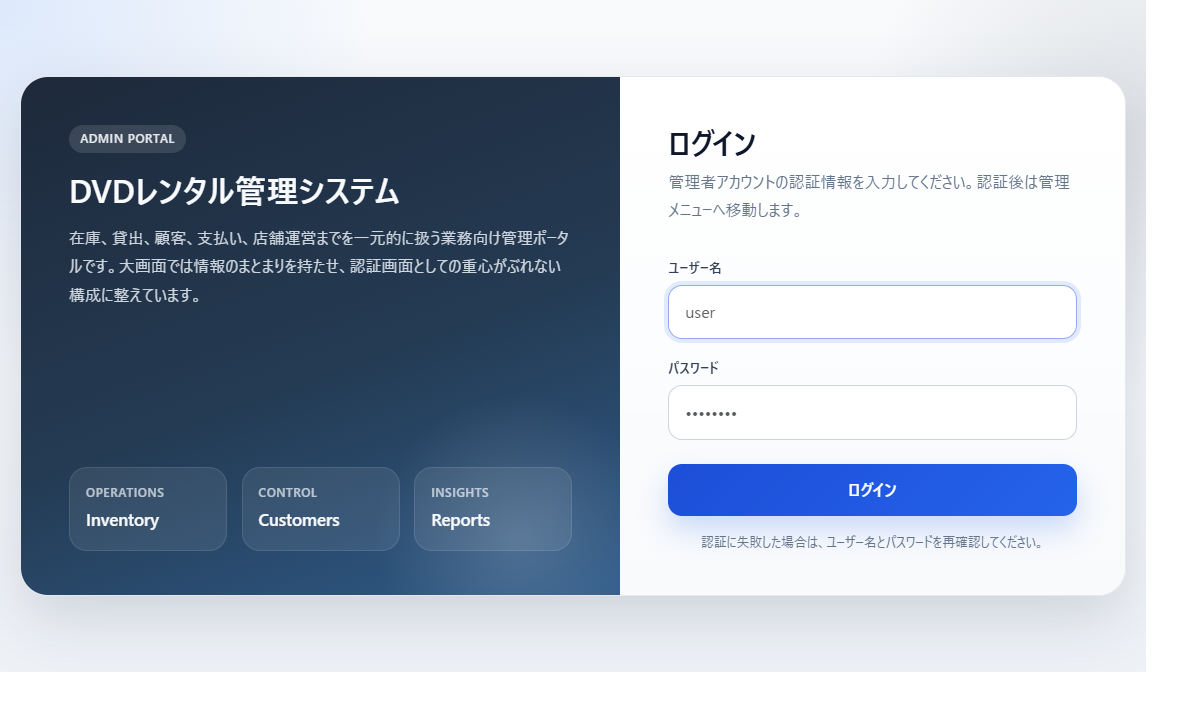
First, a login screen was prepared, with everything else reachable from there.
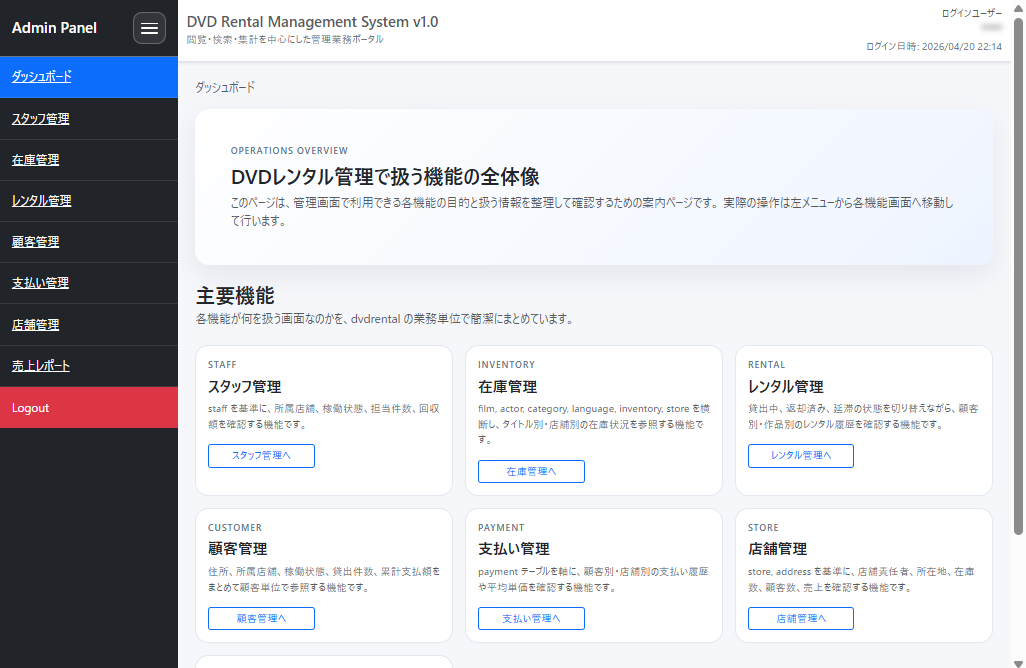
After login, a dashboard serves as the entry point where you can see rental and sales status.
Split the Spring Boot + Thymeleaf Admin Screen by Business Unit
Looking at the dvdrental schema, I first divided the screens’ roles by business unit.
The main screens prepared this time are as follows.
- Login
- Dashboard
- Customer management
- Store management
- Staff management
- Inventory management
- Payment management
- Rental management
- Sales report
Templates are split by function, like functions/customers.html and functions/payments.html.
The Java-side structure is also split the same way — feature/customer, feature/store, feature/staff — with Controller, Service, and Form grouped per feature. I wanted a structure that would stay easy to follow even as the number of screens grew.
For each feature, the information handled is kept fairly clearly separated.
Dashboard
The dashboard was built as the entry point to the whole admin screen, giving an overview of what each function handles. Rather than just a list of links, it lets you first grasp what staff, inventory, rentals, customers, payments, stores, and reports each show. The reason I built this is that business screens get harder to navigate as the number of features grows. Having a screen that shows the big picture up front makes it much less likely users get lost.
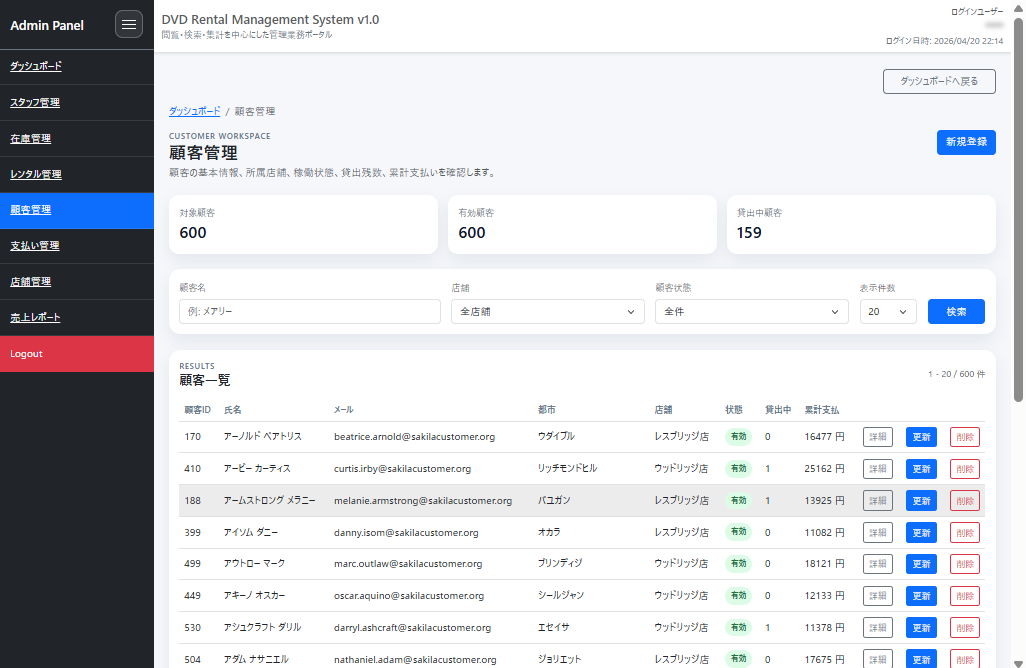
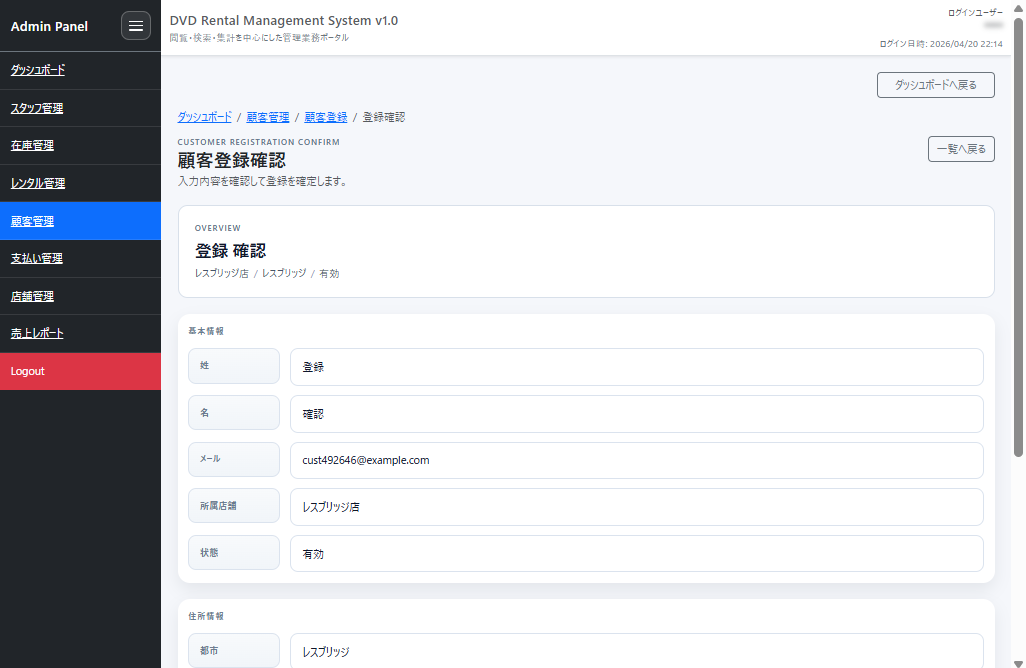
Customer Management
Customer management shows not just basic customer information, but also the affiliated store, active status, remaining rental count, and cumulative payments, all together. As a business screen, seeing just a name and email isn’t enough, so it’s built to let you track a customer’s whole situation in one place. The reason I built customer management is that it tends to be the starting point for inquiry handling and rental status checks. Without a unified view per customer, you’d end up bouncing between multiple screens every time.
Here’s what the actual screen looks like.
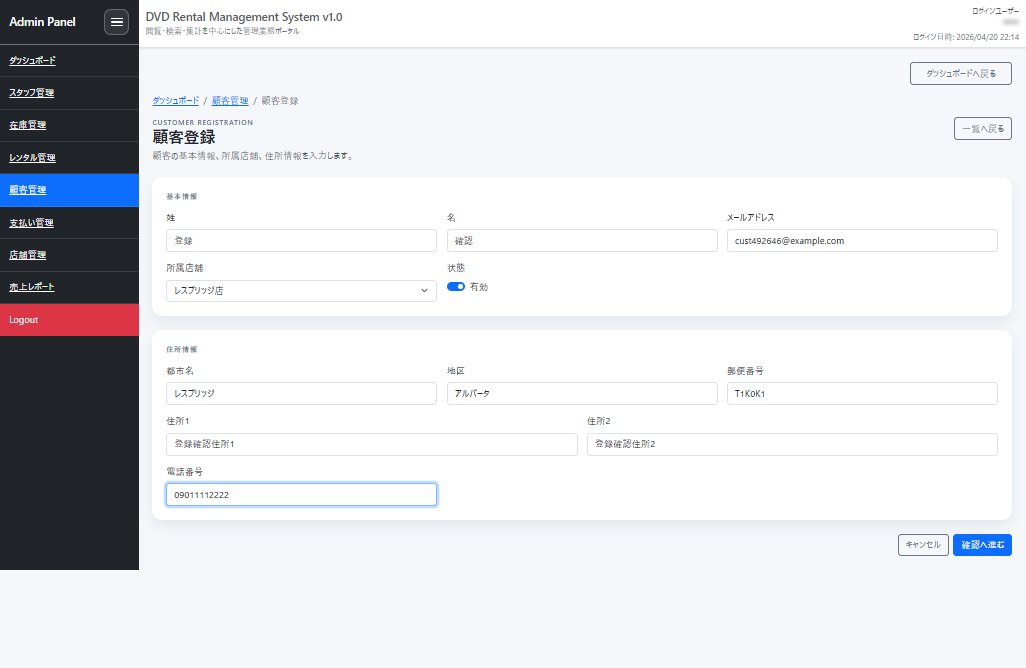
The registration screen and registration confirmation screen look like this.
Staff Management
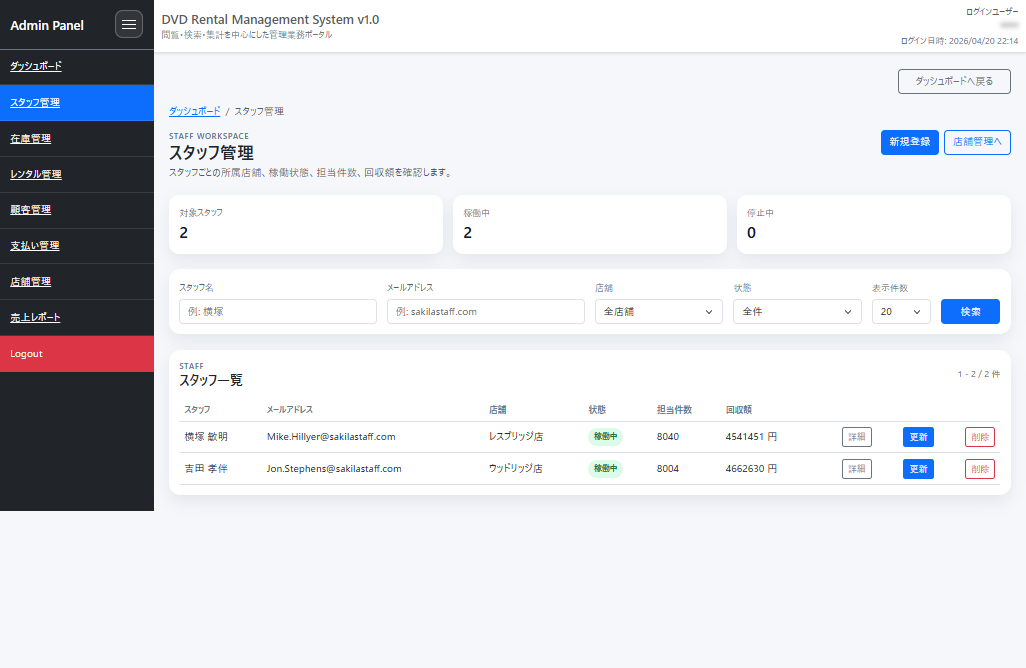
Staff management lets you confirm the affiliated store, active status, assignment count, and amount collected. Rather than leaving staff information as plain master data, it’s shifted toward showing how much they’re actually operating in practice. I added staff management not just for account management, but so I could also track who’s actually running store operations. Seeing which store someone belongs to and how much they’re handling is what gives an admin screen actual meaning.
Staff management was built with an emphasis on seeing assignment status in a single list.
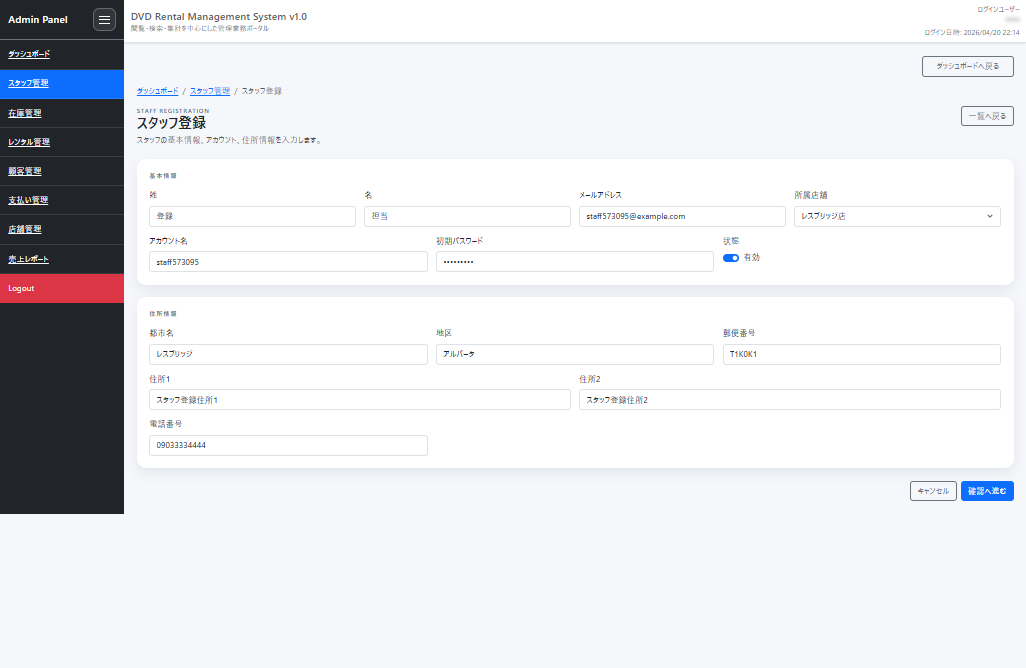
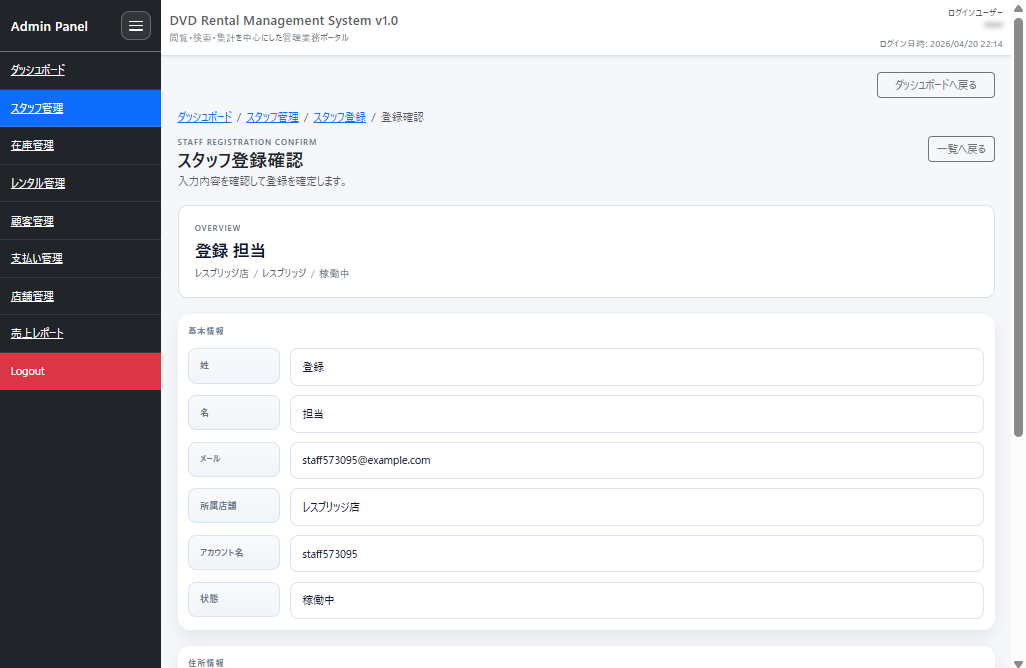
The registration screen and registration confirmation screen look like this.
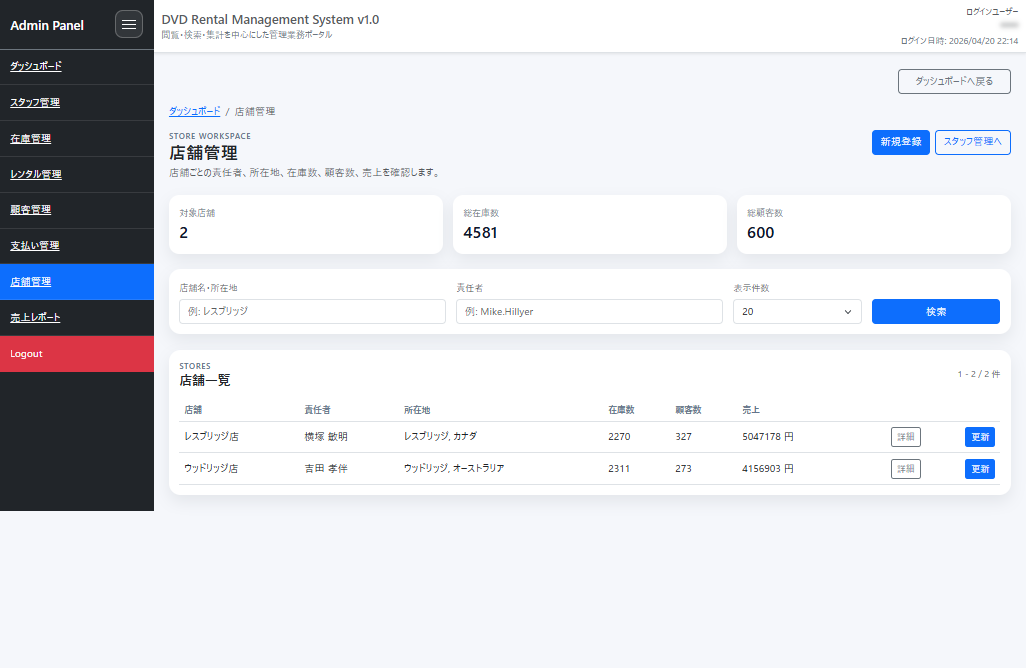
Store Management
Store management lets you see the manager, location, inventory count, customer count, and sales all together. Since there are many situations where you want to grasp store-level status, information showing each store’s scale is gathered onto one screen. Store management was necessary because staff, customers, inventory, and sales all ultimately roll up to the store level. Having a screen that lets you look at each store’s status at a glance makes grasping the overall picture much easier.
Being able to compare store information on one screen makes grasping the overall picture much easier.
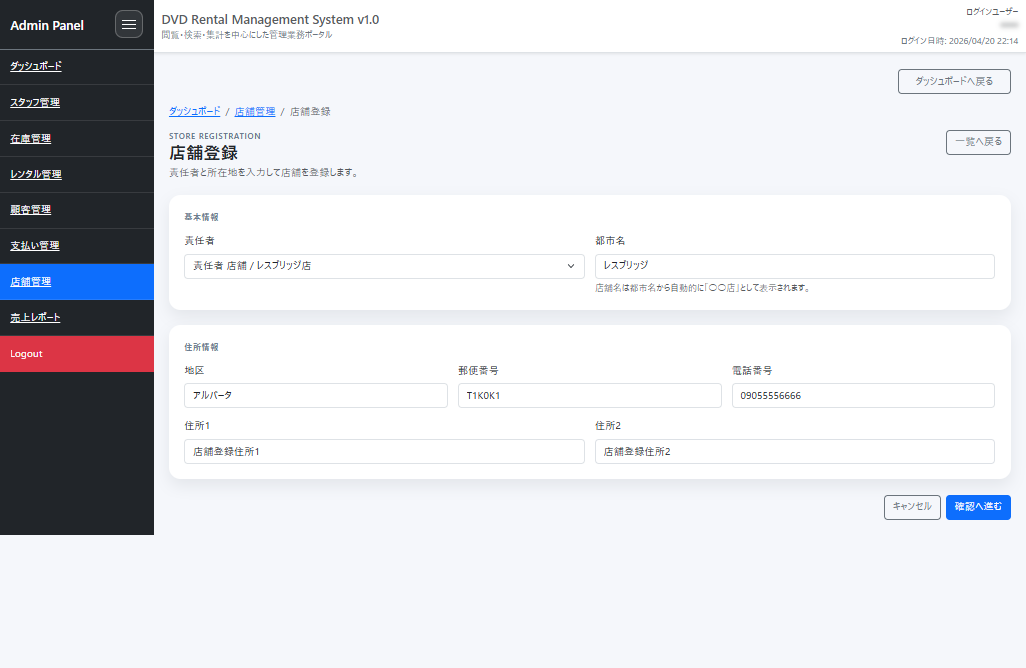
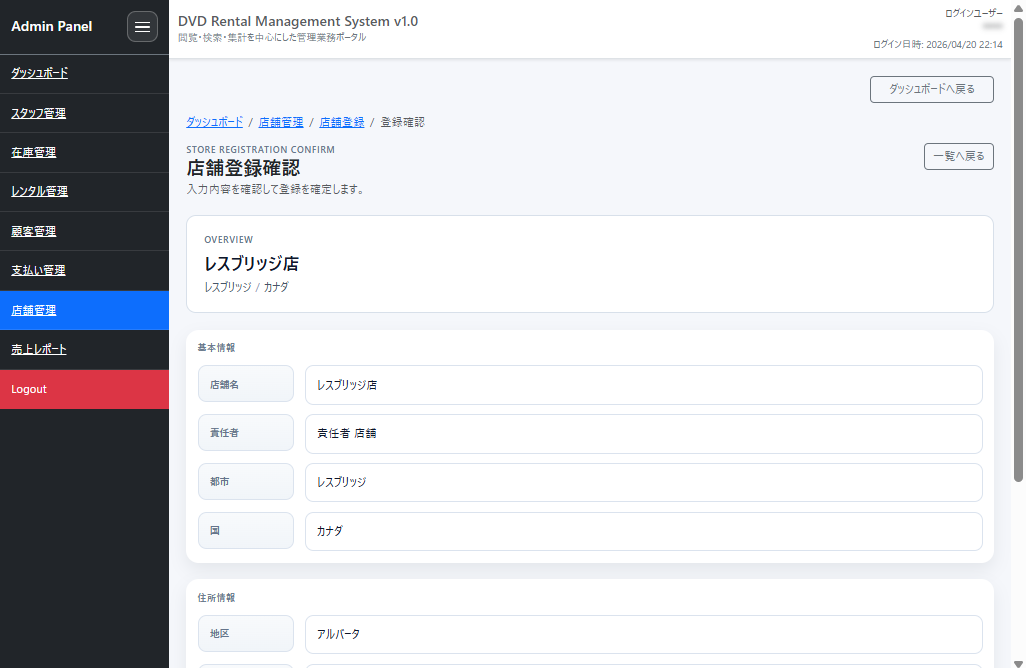
The registration screen and registration confirmation screen look like this.
Inventory Management
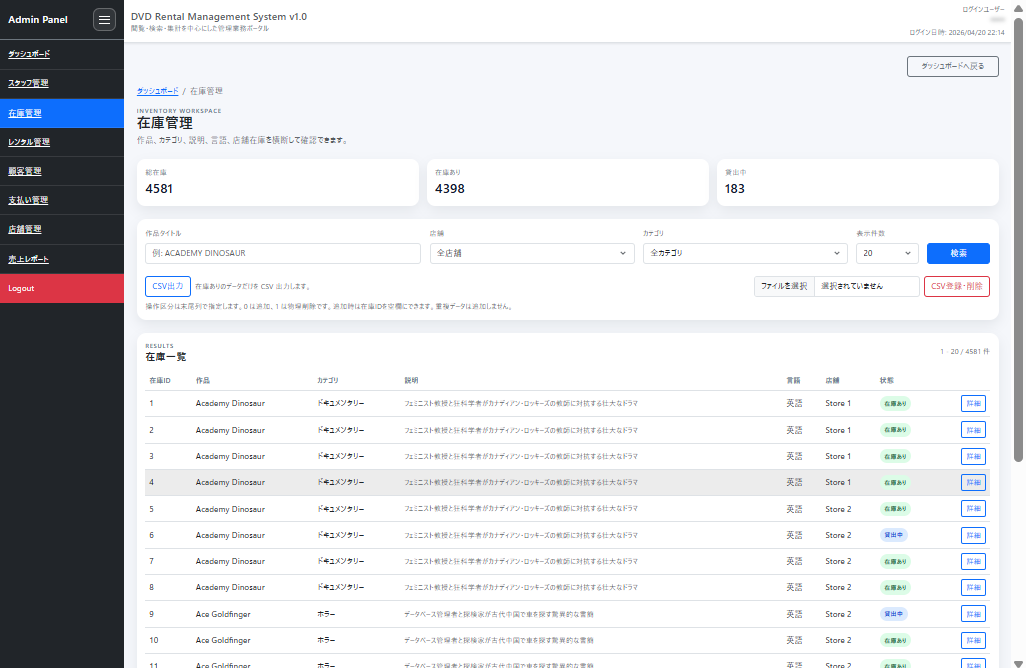
Inventory management lets you cross-check films, categories, descriptions, languages, and store inventory. It also handles CSV export and CSV registration/deletion, so it’s not just a reference screen — it supports data operations too. The reason I built inventory management is that just seeing film information isn’t enough for real operations — you need to see “what’s currently at which store.” CSV handling was added with bulk inventory adjustments in mind.
Inventory management prioritizes being able to cross-check film information and store inventory above all else.
Payment Management
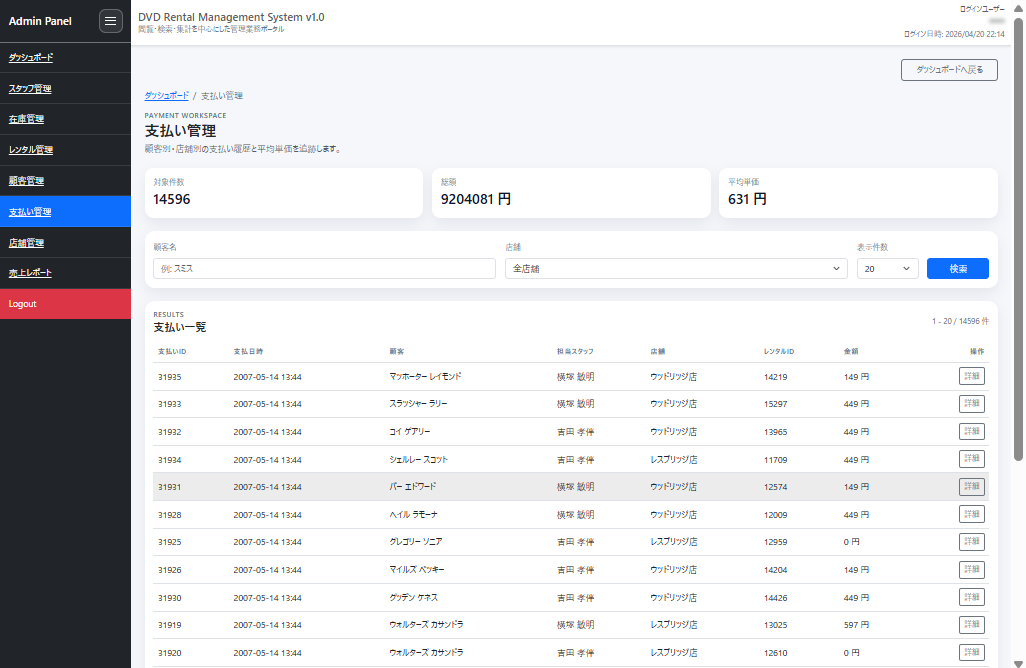
Payment management lets you track payment history by customer and by store, plus average unit price and totals. Rather than just showing the payment table as-is, I focused on presenting it grouped in ways that are meaningful for an admin screen.
I added payment management because it touches both customer support and sales confirmation. Amount information is expensive to verify if you can’t scan it as a list, so history and aggregates are shown in the same flow.
Payment management leans on strong list visibility so history and amounts come across immediately.
Rental Management
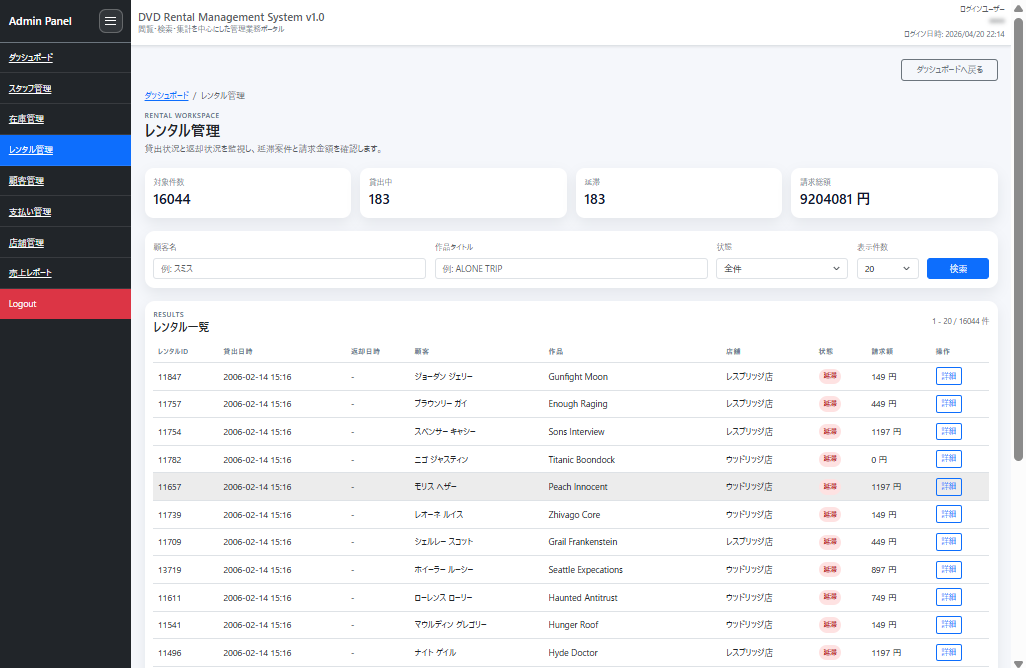
Rental management lets you switch between in-rental, returned, and overdue states while checking rental history by customer and by film. Overdue count and total billed amount are visible too, so a lot can be understood from the list screen alone. I prioritized rental management because it’s this app’s core business. If you can’t see rental and return status, inventory management and payment management don’t connect either, so I put strong emphasis on list visibility here from the start.
Rental management is built so status switching and history checking flow together as one continuous operation.
Sales Report
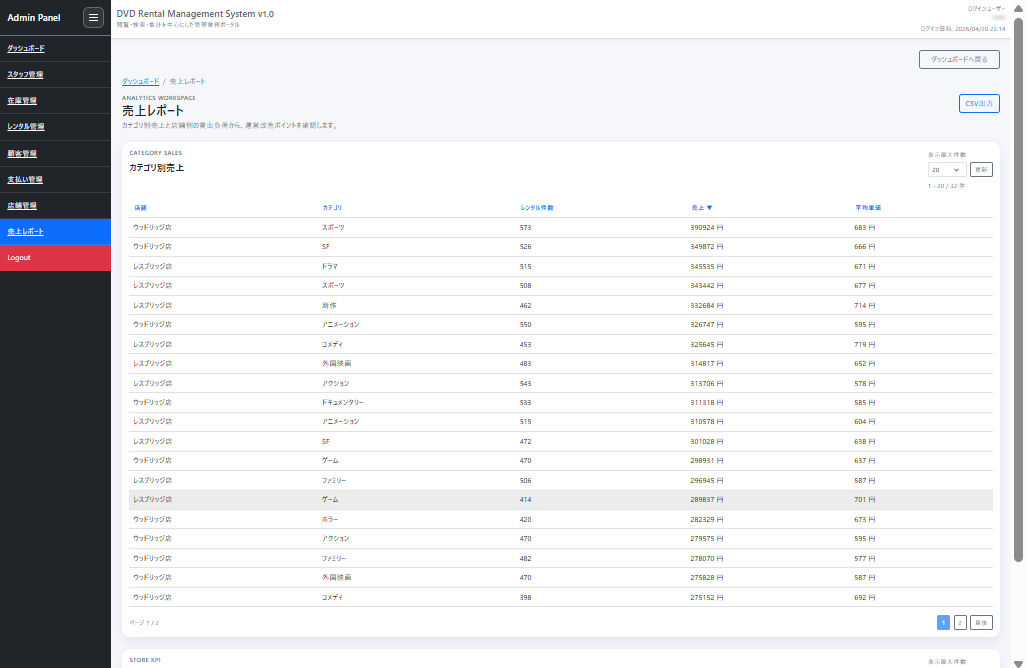
The sales report lets you check sales by category and KPIs by store. Alongside sales, rental count, and average unit price per category, it also shows store-side operational status, positioned as the place to look back on everything as numbers at the end. I added the sales report because day-to-day operational screens alone don’t show overall trends. I wanted this to be more than just an admin screen — something you could look back on with numbers later — so an analysis-leaning screen was also prepared.
The sales report is placed as the screen for reviewing the numbers at the end of the list-oriented workflow.
How the Sample DB Was Turned Into the Shape of an App
Since the existing tables are used directly in the app, I first straightforwardly mapped the table structure onto Java entities.
For example, for the customer table I created a Customer entity, mapping customer_id, store_id, first_name, last_name, email, address_id, activebool, and so on.
At this stage, what I was careful about was not jumping straight to a complex domain model. Getting to a state where the existing schema can be read correctly first, and then adding screen-specific DTOs and Forms on top, holds up better.
When building on top of a sample DB, I think how you present and let people edit the structure that already exists matters more than changing the table design itself.
Kept JPA and SQL Separate in My Thinking
As implementation progressed, registration/update-type processing and list/aggregation-type processing turned out to suit different writing styles.
So in this app, they’re roughly split like this.
- Registration, updates, and the reference foundation: JPA
- Dashboards and aggregations: SQL written directly
Flows like form input, validation, confirmation screen, and saving are easier to assemble with a JPA-based approach. Conversely, for screens like dashboards and reports where you want to show an aggregated result from the start, writing SQL directly makes the intent clearer.
Kept Search Condition Retention on the Server Side
Search condition retention for customer management is actually implemented using Spring MVC’s @SessionAttributes. On a business screen, having the conditions disappear just because you went to a detail page and came back makes things quite unusable, so this was set up from the start on the premise of server-side retention.
What this code does is simple: it puts a search form called customerSearchForm onto the session, and reuses the same object whether you’re viewing the list or executing a search. Since @ModelAttribute prepares the initial value, the first visit starts with empty search conditions, and after that the input values stick around both after a POST and after returning from the detail screen.
On a business screen, having to re-enter conditions every single time you search again is quite stressful. This part isn’t flashy processing, but it’s included as the foundation supporting the usability of list-type screens.
@Controller
@SessionAttributes("customerSearchForm")
public class CustomerController {

	@GetMapping("/functions/customers")
	public String customers(Model model, @ModelAttribute("customerSearchForm") CustomerSearchForm form) {
		return renderCustomers(form, model);
	}

	@ModelAttribute("customerSearchForm")
	public CustomerSearchForm customerSearchForm() {
		return new CustomerSearchForm();
	}

	@PostMapping("/functions/customers")
	public String customers(@ModelAttribute("customerSearchForm") CustomerSearchForm form, Model model) {
		return renderCustomers(form, model);
	}
}
Gathered Dashboard Aggregation With SQL
For the dashboard, I took the opposite approach and decided from the start to pull everything together with SQL. Open rental count, overdue count, inventory count, active customer count, and sales for the last 30 days were the metrics I wanted to glance at right at the admin screen’s entry point, so they’re gathered and fetched in a single query.
I judged that, rather than walking through several layers of JPA entities, it’s more readable to define the numbers you ultimately want to show on screen directly in SQL. Using count(*) filter (...) and subqueries, it returns just the metrics needed for the card display, bundled together.
On the Java side, queryForMap receives a single row, and that value gets repacked into the display model for the dashboard. In other words, this layer’s job is simply to convert the DB’s aggregated result directly into UI metrics.
Map<String, Object> summary = jdbcTemplate.queryForMap(
		"""
		select
			count(*) filter (where return_date is null) as open_rentals,
			count(*) filter (
				where return_date is null
				  and rental_date < current_timestamp - (interval '1 day' * 3)
			) as overdue_rentals,
			(select count(*) from inventory) as inventory_count,
			(select count(*) from customer where activebool) as active_customers,
			(select coalesce(sum(amount), 0) from payment where payment_date >= current_date - interval '30 day') as monthly_sales
		from rental
		""",
		new MapSqlParameterSource());
Login Also Uses the Sample DB’s staff
Login uses Spring Security.
However, rather than placing a fixed in-memory user, it’s set up to log in using the staff table’s data.
In other words, the staff information that exists in the sample DB is treated directly as the users who enter the admin screen.
The UserDetailsService implementation loads staff by username and the active flag, and after authentication, transitions to the admin screen.
With this approach, authentication never ends up being dummy data living in its own separate world — it keeps a natural connection between the staff information shown on screen and the logged-in user.
Also Cut Down the Stress of Login Failures
The login configuration is a straightforward setup where only the login screen is public and everything else requires authentication. The reason the username is kept in the session on login failure is to reduce the stress of having to re-type it.
What matters in this configuration is that the authorization rules, the login processing URL, and the failure handling are all gathered into the Spring Security configuration. Only /login and the authentication processing URL are public; every normal screen requires authentication.
Also, loginFailureHandler stashes the already-entered username into the session on authentication failure. The password isn’t kept — only the username is returned — which makes it easier to balance usability and safety.
http.authorizeHttpRequests(auth -> auth
	.requestMatchers("/login", LOGIN_PROCESSING_PATH).permitAll()
	.requestMatchers("/css/**").permitAll()
	.anyRequest().authenticated()
)
.formLogin(form -> form
	.loginPage("/login")
	.loginProcessingUrl(LOGIN_PROCESSING_PATH)
	.failureHandler(loginFailureHandler())
	.successHandler(loginSuccessHandler())
	.permitAll()
);

@Bean
public AuthenticationFailureHandler loginFailureHandler() {
	return (request, response, exception) -> {
		request.getSession(true).setAttribute(LOGIN_USERNAME_SESSION_KEY, request.getParameter("username"));
		response.sendRedirect(request.getContextPath() + "/login?error");
	};
}
Things I Was Careful About as a Business Screen
In this app, more than polishing the appearance, I prioritized making it operable as a business screen without stress.
What I was particularly careful about:
- Conditions stay in place after going from a list to a detail screen and back
- Input values stay in place after going from an update screen to a confirmation screen and back
- The username is retained on login failure
- Sidebar state is retained across screen transitions
For a server-rendered admin screen, details like these connect directly to usability. I built it with the mindset that operations shouldn’t be interrupted midway through, not just that the screens render.
Made Inventory Operable via CSV Too
Making CSV handling available for inventory management is another part that reflects operational realities. Touching things one at a time from the screen takes too long, so search results with stock can be exported as CSV, and the same data can be bulk-registered or bulk-deleted directly.
In this export process, the screen’s search conditions are first packed into a MapSqlParameterSource and passed to the SQL. The key point is that the titleEnabled and storeEnabled flags toggle whether each condition is active, so the same SQL works whether or not a keyword was entered or a store was selected.
Rather than converting the fetched result directly into a CSV string, it’s first mapped into InventoryCsvRow. That keeps the correspondence between the SQL result and the CSV output columns clear, which makes it easier to follow later when columns are added or removed.
public byte[] exportCsv(InventorySearchForm form) {
    MapSqlParameterSource params = new MapSqlParameterSource()
	    .addValue("titleEnabled", StringUtils.hasText(form.getTitleKeyword()))
	    .addValue("titleKeyword", toSqlLike(form.getTitleKeyword()))
	    .addValue("storeEnabled", form.getStoreId() != null)
	    .addValue("storeId", form.getStoreId() != null ? form.getStoreId() : -1);

    List<InventoryCsvRow> rows = jdbcTemplate.query(
	    """
	    select i.inventory_id, i.film_id, f.title, i.store_id
	    from inventory i
	    join film f on f.film_id = i.film_id
	    where (:titleEnabled = false or lower(f.title) like :titleKeyword)
	      and (:storeEnabled = false or i.store_id = :storeId)
	    """,
	    params,
	    (rs, rowNum) -> new InventoryCsvRow(
		    rs.getInt("inventory_id"),
		    rs.getShort("film_id"),
		    rs.getString("title"),
		    "",
		    "",
		    rs.getShort("store_id")));
    // CSV assembly processing
}
What Was Good About Building on a Sample DB
What turned out to be genuinely good was that, since data relationships already exist from the start, there’s never a shortage of subject matter when adding new screens.
For example, you can naturally expand in the following flow.
- Build the customer list
- Build customer detail
- Build customer update
- Expand into stores, staff, inventory
- Add list-type screens like payments, rentals, reports
- Finally give it an overall sense with the dashboard
Compared to inventing a business domain from zero, being pulled along by an existing schema while adding screens is a good fit for both learning and implementation practice.
If I Were Building This From Scratch Again, This Order Works Well
If you’re building an admin screen using a PostgreSQL sample DB as your subject matter, it goes more smoothly if you don’t try to build everything from the start.
Here’s the order I’d personally follow.
- First, start the DB and look at what’s inside
- Build list screens starting from easy-to-understand tables like customers, staff, and stores
- Expand into detail, update, and confirmation screens
- After that, add payments, rentals, reports, and the dashboard
- Finally, polish authentication and the overall usability of the screens
Deciding up front that “the PostgreSQL sample DB is the foundation” makes it much less likely you’ll get stuck deciding what to build.
Summary
For building the DVD rental admin app itself, the very first thing I settled on was using the PostgreSQL sample DB as the foundation.
Using dvdrental means subject matter like customers, stores, staff, inventory, rentals, and payments is ready from the start, making it easy to expand into screen design, authentication, lists, details, updates, and aggregation.
Rather than designing business data from scratch, it’s easier to first understand the existing schema and build an admin screen on top of it.
I’d be glad if this is useful to anyone who wants to try building a business app with Spring Boot + Thymeleaf, using a PostgreSQL sample DB as the subject matter.
The setup and thinking behind putting it on AWS is covered in this article.