เหตุใดหน้าชำระเงินควรเป็น "Isolated Checkout" และวิธี Implement
บทนำ
เมื่อออกแบบหน้าชำระเงินของ EC site มีคำถามว่า “จะจัดการ header และ navigation ยังไง”
อาจคิดว่า “ใช้ header ปกติไปเลยก็ได้” แต่ EC ใหญ่ๆ อย่าง Amazon, Stripe Checkout, Rakuten
ซ่อน navigation ปกติในหน้าชำระเงิน
สิ่งนี้เรียกว่า Isolated Checkout (Checkout แบบแยกส่วน)
เหตุใดต้องแยกหน้าชำระเงิน?
เหตุผล 1: ป้องกันผู้ใช้ออกจากระบบ
เมื่อ navigation มองเห็นได้ระหว่าง checkout flow ผู้ใช้จะคิดว่า “อ้อ ฉันควรไปดูสินค้าอีกชิ้นด้วย” และออกไป
Cart abandonment ส่วนหนึ่งเกิดจาก link ที่ไม่จำเป็นที่มีอยู่ระหว่าง checkout flow
เหตุผล 2: สร้างความรู้สึกของความน่าเชื่อถือและความปลอดภัย
ยิ่งหน้าชำระเงินเรียบง่าย ความตระหนักของผู้ใช้ก็จะเปลี่ยนเป็น “ฉันกำลังทำการชำระเงินอยู่”
แทนที่จะเห็น nav ที่รกรุงรัง พวกเขาจะรู้สึกว่า “นี่คือหน้าที่ปลอดภัย”
เหตุผล 3: ป้องกันการกดผิด
ป้องกันอุบัติเหตุอย่างการกดลิงก์ใน nav โดยตั้งใจจะกดปุ่มย้อนกลับ
หรือ focus ย้ายไปที่ search bar ขณะกรอกฟอร์ม
Isolated Checkout ของ Amazon
ดู checkout flow ของ Amazon:
- Header ปกติ (search bar, cart icon, menu) → ซ่อน
- Header เรียบง่ายแสดงแค่โลโก้
amazon→ แสดง - Footer ก็ minimal ด้วย (เฉพาะลิงก์ customer service)
นี่คือการออกแบบ Isolated Checkout แบบ typical
การ Implement ใน Vue 3
สลับ Layout ใน Router Configuration
// router/index.ts
import { createRouter, createWebHistory } from 'vue-router'

const routes = [
  // หน้าปกติ (พร้อม standard header/footer)
  {
    path: '/',
    component: () => import('@/layouts/DefaultLayout.vue'),
    children: [
      { path: '', component: () => import('@/views/HomeView.vue') },
      { path: 'films', component: () => import('@/views/FilmsView.vue') },
    ],
  },

  // หน้าชำระเงิน (Isolated Checkout layout)
  {
    path: '/checkout',
    component: () => import('@/layouts/CheckoutLayout.vue'),  // ← layout แยก
    children: [
      { path: '', component: () => import('@/views/CheckoutView.vue') },
      { path: 'confirm', component: () => import('@/views/CheckoutConfirmView.vue') },
      { path: 'complete', component: () => import('@/views/CheckoutCompleteView.vue') },
    ],
  },
]
DefaultLayout.vue (หน้าปกติ)
<!-- layouts/DefaultLayout.vue -->
<template>
  <div class="layout-default">
    <AppHeader />     <!-- มี search bar, cart, nav -->
    <main>
      <RouterView />
    </main>
    <AppFooter />
  </div>
</template>
CheckoutLayout.vue (หน้าชำระเงิน)
<!-- layouts/CheckoutLayout.vue -->
<template>
  <div class="layout-checkout">
    <!-- Header เรียบง่าย: โลโก้เท่านั้น -->
    <header class="checkout-header">
      <div class="checkout-header-inner">
        <RouterLink to="/" class="checkout-logo">
          DVD Rental
        </RouterLink>
        <!-- ไม่มี nav ไม่มี search ไม่มี cart icon -->
        <div class="checkout-security-badge">
          <i class="bi bi-shield-lock-fill" />
          <span>Secure Checkout</span>
        </div>
      </div>
    </header>

    <main class="checkout-main">
      <RouterView />
    </main>

    <!-- Footer minimal -->
    <footer class="checkout-footer">
      <a href="/help">ช่วยเหลือ</a>
      <a href="/privacy">นโยบายความเป็นส่วนตัว</a>
    </footer>
  </div>
</template>

<style scoped>
.checkout-header {
  border-bottom: 1px solid #ddd;
  padding: 12px 0;
  background: #fff;
}

.checkout-header-inner {
  max-width: 800px;
  margin: 0 auto;
  padding: 0 16px;
  display: flex;
  justify-content: space-between;
  align-items: center;
}

.checkout-logo {
  font-size: 1.4rem;
  font-weight: bold;
  color: #333;
  text-decoration: none;
}

.checkout-security-badge {
  display: flex;
  align-items: center;
  gap: 6px;
  color: #28a745;
  font-size: 0.9rem;
}

.checkout-main {
  max-width: 800px;
  margin: 0 auto;
  padding: 32px 16px;
}

.checkout-footer {
  border-top: 1px solid #ddd;
  padding: 16px;
  text-align: center;
  font-size: 0.85rem;
  color: #666;
}

.checkout-footer a {
  margin: 0 12px;
  color: #666;
}
</style>
แสดง Step ใน Checkout Flow
ภายใน checkout flow แสดง progress bar บอก step ที่ผู้ใช้อยู่
<!-- CheckoutProgressBar.vue -->
<template>
  <div class="checkout-progress">
    <div
      v-for="step in steps"
      :key="step.id"
      class="step"
      :class="{
        'step--active': currentStep === step.id,
        'step--completed': currentStep > step.id,
      }"
    >
      <div class="step-number">{{ step.id }}</div>
      <div class="step-label">{{ step.label }}</div>
    </div>
  </div>
</template>

<script setup lang="ts">
defineProps<{ currentStep: number }>()

const steps = [
  { id: 1, label: 'ตรวจสอบ' },
  { id: 2, label: 'ชำระเงิน' },
  { id: 3, label: 'เสร็จสิ้น' },
]
</script>
การออกแบบปุ่ม “ย้อนกลับ”
ใน Isolated Checkout ผู้ใช้สามารถออกจาก checkout flow โดยใช้ปุ่มย้อนกลับของ browser
นี่คือพฤติกรรมที่ตั้งใจไว้
อย่างไรก็ตามต้องระวังว่า “ย้อนกลับ” ในหน้ายืนยัน/เสร็จสิ้นการชำระเงินจะไม่ทำให้เกิดการส่งซ้ำ:
// CheckoutCompleteView.vue
import { onMounted } from 'vue'
import { useRouter } from 'vue-router'

const router = useRouter()

onMounted(() => {
  // แทน history เพื่อให้กดย้อนกลับในหน้าเสร็จสิ้นไปที่ top
  router.replace('/checkout/complete')
})
สรุป
| หน้าปกติ | หน้าชำระเงิน (Isolated Checkout) |
|---|---|
| Header ปกติ (search, nav) | Header เรียบง่ายมีแค่โลโก้ |
| Footer ครบฟีเจอร์ | Footer ลิงก์ minimal |
| UI ที่ส่งเสริมการท่องเว็บ | UI ที่มุ่งเน้นการชำระเงินให้เสร็จ |
ใน Vue 3 การใช้ การสลับ layout component
ช่วยให้แยก layout ที่ระดับ routing ได้
“Layout แยกเฉพาะหน้าชำระเงิน” ใช้โค้ดแค่ไม่กี่สิบบรรทัด
และเป็นการออกแบบ UX ที่สำคัญที่ส่งผลต่อ completion rate (conversion) ของผู้ใช้ด้วย
การ Implement ในแอปนี้
แอป DVD Rental นี้ไม่ใช้ Vue Router แต่บรรลุ Isolated Checkout
โดยใช้ วิธี single-file ด้วย currentPage ref
การตรวจสอบ isCheckoutFlow (โค้ดจริง)
// App.vue
const currentPage = ref<
  'films' | 'cd-rentals' | 'streaming' | 'ranking' | 'feature' |
  'detail' | 'auth' | 'mypage' | 'member-register' | 'member-register-confirm' |
  'member-edit' | 'checkout' | 'checkout-complete' | ...
>('films')

// ตรวจสอบว่าอยู่ใน checkout flow หรือไม่
const isCheckoutFlow = computed(() => {
  return currentPage.value === 'checkout' || currentPage.value === 'checkout-complete'
})
การสลับ Layout ใน Template (โค้ดจริง)
<!-- App.vue -->

<!-- Header ปกติ (ซ่อนระหว่าง checkout flow) -->
<header class="masthead" v-if="!isCheckoutFlow">
  <!-- โลโก้, cart icon, navigation ฯลฯ -->
</header>

<!-- Header เฉพาะ checkout (แสดงเฉพาะระหว่าง checkout flow) -->
<header class="checkout-masthead" v-if="isCheckoutFlow">
  <!-- โลโก้เท่านั้น, security badge -->
</header>

<!-- Global nav (ซ่อนระหว่าง checkout flow) -->
<nav class="global-tabs" v-if="!isCheckoutFlow">
  <!-- รายการภาพยนตร์, ranking ฯลฯ tabs -->
</nav>

<!-- Footer (ซ่อนระหว่าง checkout flow) -->
<footer class="site-footer" v-if="!isCheckoutFlow">
  <!-- Footer ปกติ -->
</footer>
เมื่อเทียบกับ Vue Router layout routing ใช้โค้ดน้อยกว่า:
แค่เพิ่ม v-if="!isCheckoutFlow" ให้ UI elements ปกติ ก็ซ่อน header, nav, และ footer พร้อมกันทีเดียว
เช่าเดี๋ยวนี้ → การเปลี่ยนไปหน้าชำระเงิน (โค้ดจริง)
// App.vue
const selectedFilm = ref<PublicFilmSummary | null>(null)

const handleDirectCheckout = (film: PublicFilmSummary) => {
  selectedFilm.value = film   // เก็บภาพยนตร์ที่จะ checkout ไว้
  currentPage.value = 'checkout'  // สลับไป Isolated Checkout
}
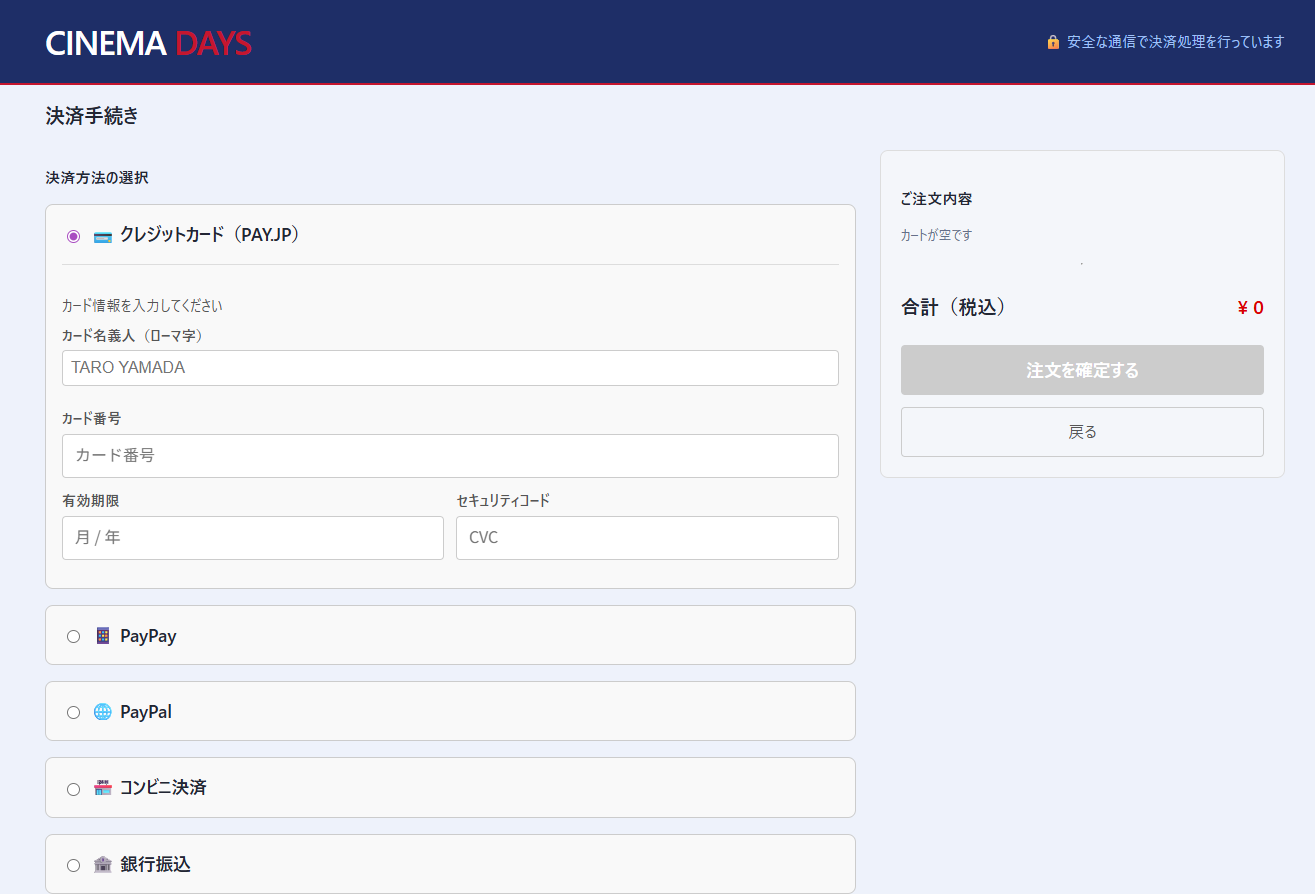
หน้าจอจริง
หน้าชำระเงิน (Isolated Checkout) Header แสดงแค่โลโก้ ไม่มี navigation: